Home>Culinary & Beverages>Tempering Chocolate: A Step-by-Step Guide For Perfect Results
Culinary & Beverages
Tempering Chocolate: A Step-by-Step Guide For Perfect Results
Modified: February 28, 2024
Learn the art of tempering chocolate with our step-by-step guide for perfect results. Elevate your culinary skills with this essential technique. Ideal for enthusiasts in the culinary and beverages industry.
(Many of the links in this article redirect to a specific reviewed product. Your purchase of these products through affiliate links helps to generate commission for Temperatures.com, at no extra cost. Learn more)
Table of Contents
Introduction
Tempering chocolate is a crucial technique in the realm of pastry and confectionery. It involves the precise manipulation of chocolate's temperature to ensure that the finished product possesses a glossy appearance, a satisfying snap, and a smooth texture. Whether you're a professional pastry chef or an enthusiastic home cook, mastering the art of chocolate tempering can elevate your desserts and confections to a whole new level.
The process of tempering chocolate may seem daunting at first, but with the right guidance and a bit of practice, anyone can achieve perfect results. By understanding the science behind chocolate crystallization and employing the appropriate methods, you can unlock the full potential of this delectable ingredient.
In this comprehensive guide, we will delve into the intricacies of chocolate tempering, providing you with a step-by-step approach to achieve flawless outcomes. From the essential equipment and ingredients to the meticulous techniques involved, we will walk you through the entire process, ensuring that you gain a deep understanding of this fundamental skill.
Whether you aspire to craft beautifully enrobed truffles, delicate chocolate decorations, or perfectly coated fruits, the knowledge of chocolate tempering is indispensable. By the end of this guide, you will be equipped with the expertise to produce professional-quality chocolate creations that not only look stunning but also boast a delightful texture and flavor.
So, roll up your sleeves, gather your chocolate, and let's embark on this exciting journey to unravel the secrets of chocolate tempering. Get ready to elevate your confectionery skills and impress your friends, family, or customers with impeccable chocolate treats. Let's dive into the fascinating world of chocolate tempering and unleash your inner chocolatier!
Read more: Mastering The Art Of Tempering Chocolate
Understanding Chocolate Tempering
Chocolate tempering is a precise process that involves manipulating the temperature of chocolate to control the crystallization of cocoa butter. This technique is essential for achieving the desired characteristics in chocolate, including a glossy appearance, firm texture, and a satisfying snap when broken. Understanding the science behind chocolate tempering is crucial for mastering this art and consistently producing high-quality chocolate creations.
At its core, chocolate is composed of various types of crystals, with the most stable form being the desirable Type V crystal structure. When chocolate is melted, these crystals break down, resulting in an unstable mixture. To achieve the ideal texture and appearance, it is necessary to guide the cocoa butter back into its stable crystalline form through the process of tempering.
The tempering process involves precise temperature control, which encourages the formation of the desired Type V crystals while preventing the formation of undesirable crystal structures. By carefully manipulating the temperature of the chocolate, you can ensure that it sets properly, maintains a glossy sheen, and possesses a smooth mouthfeel.
There are several methods for tempering chocolate, each with its own set of advantages and challenges. The most common techniques include the seeding method, tabling method, and tempering machine method. Each approach requires a thorough understanding of temperature ranges, agitation, and crystallization dynamics to achieve the desired results.
Successful chocolate tempering is not only about achieving the right temperature but also about maintaining it throughout the process. Factors such as the type of chocolate, ambient temperature, and the specific application of the tempered chocolate must be considered to ensure consistent and reliable outcomes.
By comprehending the intricacies of chocolate tempering, you can elevate your confectionery skills and unlock the full potential of chocolate as a versatile and delightful ingredient. With a solid grasp of the underlying principles and techniques, you will be well-equipped to embark on the journey of tempering chocolate with confidence and precision.
Equipment and Ingredients Needed
To embark on the journey of chocolate tempering, it's essential to gather the right equipment and ingredients to ensure a seamless and successful process. Here's a comprehensive list of what you'll need:
Equipment:
- Double Boiler or Microwave: A double boiler provides gentle, indirect heat, which is ideal for melting chocolate without scorching it. Alternatively, a microwave can be used for melting chocolate, offering convenience and speed.
- Chocolate Thermometer: A reliable chocolate thermometer is indispensable for monitoring the temperature during the tempering process. It ensures precision and accuracy, allowing you to achieve the desired crystalline structure in the chocolate.
- Offset Spatula: This tool is useful for spreading the melted chocolate evenly and smoothly, especially when working with molds or creating chocolate decorations.
- Rubber Spatula: A flexible rubber spatula aids in stirring and scraping the chocolate, ensuring that it melts uniformly and doesn't stick to the sides of the bowl.
- Bench Scraper or Palette Knife: These tools are handy for manipulating and spreading the tempered chocolate, particularly when working with large quantities or on flat surfaces.
- Parchment Paper or Silicone Mats: These are essential for setting and cooling the tempered chocolate, providing a non-stick surface for easy handling and clean-up.
- Mold for Chocolate: If you plan to create molded chocolates or pralines, having the appropriate molds is crucial. Choose molds that are made specifically for chocolate work, ensuring easy release and a professional finish.
- Cooling Racks: These allow air circulation around the tempered chocolate, promoting even cooling and setting.
Ingredients:
- High-Quality Chocolate: Selecting high-quality chocolate with a cocoa content of around 60-70% is essential for achieving superior flavor and texture in the tempered chocolate. Choose chocolate from reputable brands known for their craftsmanship and quality ingredients.
- Seeding Chocolate: This refers to additional chocolate used in the seeding method to facilitate the formation of stable cocoa butter crystals. The seeding chocolate should be of the same type and quality as the chocolate being tempered.
- Optional Flavorings: If desired, you can incorporate flavorings such as vanilla extract, citrus zest, or spices to enhance the taste of the tempered chocolate. Ensure that any added ingredients are dry and free from moisture to prevent seizing.
By assembling these essential tools and ingredients, you'll be well-prepared to embark on the chocolate tempering process with confidence and precision. With the right equipment at your disposal, you can focus on honing your skills and mastering the art of chocolate tempering to create exquisite confections and desserts.
Step 1: Melting the Chocolate
The first step in the chocolate tempering process is melting the chocolate. Properly melting the chocolate sets the foundation for achieving the desired crystalline structure during tempering. Whether you choose to use a double boiler or a microwave, the goal is to melt the chocolate gently and uniformly without overheating or burning it.
If using a double boiler, fill the bottom pot with a small amount of water and bring it to a gentle simmer. Place the chopped chocolate in the top pot or heatproof bowl, ensuring that it fits snugly to prevent steam or water from coming into contact with the chocolate. Stir the chocolate occasionally as it melts, ensuring that it heats evenly and gradually.
Alternatively, the microwave method offers convenience and speed. Place the chopped chocolate in a microwave-safe bowl and heat it in short bursts, stirring between each interval. It's crucial to monitor the chocolate closely to prevent overheating, as chocolate can easily scorch and become unusable if subjected to high temperatures.
Regardless of the method chosen, it's important to melt the chocolate until it is smooth, free of lumps, and reaches the appropriate temperature for the specific type of chocolate being used. Dark, milk, and white chocolates have different melting and tempering temperature ranges, so it's essential to refer to the chocolate thermometer and the chocolate manufacturer's recommendations for precise melting temperatures.
During the melting process, avoid introducing moisture or steam to the chocolate, as even a small amount can cause the chocolate to seize, resulting in a grainy and unusable texture. Additionally, ensure that all utensils and equipment are completely dry, as any moisture can compromise the integrity of the chocolate.
By mastering the art of melting chocolate with precision and care, you set the stage for successful tempering and the creation of beautifully finished chocolate confections. With the chocolate melted to perfection, you are ready to proceed to the next crucial step in the tempering process, setting the stage for achieving flawless results in your chocolate creations.
Step 2: Seeding Method
The seeding method is a popular technique used in chocolate tempering to encourage the formation of stable cocoa butter crystals, essential for achieving the desired texture and appearance in tempered chocolate. This method involves the incorporation of tempered chocolate, known as the "seed," into the melted chocolate to initiate the crystallization process. By introducing stable crystals into the melted chocolate, the cocoa butter molecules align themselves, promoting the formation of the desired Type V crystals throughout the mixture.
To begin the seeding method, reserve a portion of tempered chocolate from a previous batch or a high-quality, pre-tempered chocolate. This reserved chocolate serves as the seed and contains the stable crystalline structure necessary to guide the crystallization of the melted chocolate. The amount of seed chocolate to be added depends on the quantity of chocolate being tempered and the specific tempering temperature ranges for the type of chocolate used.
Once the chocolate is melted and reaches the appropriate temperature, remove it from the heat source and begin the seeding process. Add a small amount of the seed chocolate to the melted chocolate and stir gently to incorporate it. The seed chocolate acts as a template for the formation of stable crystals, effectively seeding the entire batch of melted chocolate with the desired crystalline structure.
Continuously monitor the temperature of the chocolate during the seeding process, ensuring that it remains within the recommended tempering range. The addition of the seed chocolate should gradually lower the temperature of the melted chocolate, promoting the formation of the desired Type V crystals. Stir the chocolate gently but consistently to distribute the seed chocolate evenly and encourage uniform crystallization.
As the chocolate cools and the stable crystals propagate throughout the mixture, the tempered chocolate begins to take on the glossy appearance and firm texture characteristic of properly tempered chocolate. The seeding method provides a reliable and effective means of achieving consistent results in chocolate tempering, offering control over the crystallization process and ensuring the creation of professional-quality chocolate confections.
By mastering the seeding method, you can harness the power of stable cocoa butter crystals to produce flawlessly tempered chocolate with a smooth mouthfeel and a captivating sheen. This method empowers you to elevate your chocolate creations, whether it's crafting delicate bonbons, enrobing luscious truffles, or creating intricate chocolate decorations. With precision and expertise, the seeding method becomes a valuable tool in your confectionery repertoire, enabling you to achieve perfect results in chocolate tempering time and time again.
Step 3: Testing the Tempered Chocolate
After completing the seeding method and allowing the chocolate to cool to the specified working temperature, it's crucial to verify that the chocolate has been tempered successfully. Testing the tempered chocolate ensures that it possesses the desired characteristics, including a glossy appearance, firm texture, and the ability to set properly. This step is essential for confirming that the chocolate is ready for application in various confectionery and pastry creations.
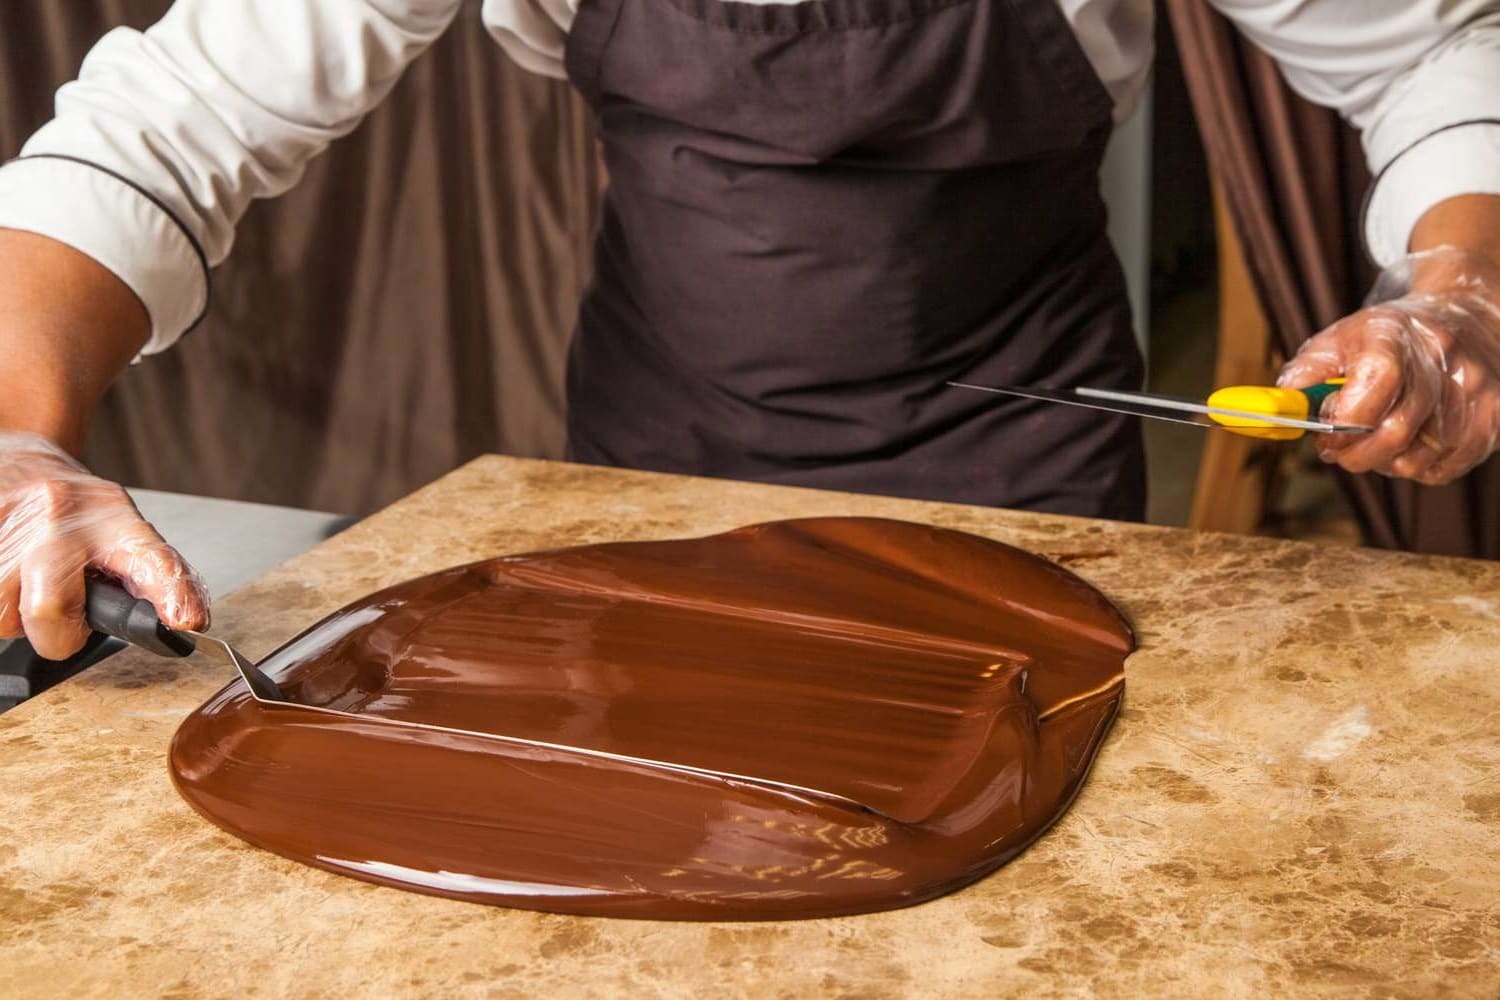
One of the most reliable methods for testing tempered chocolate is the "paper test." To perform this test, dip a clean, dry palette knife or the edge of a parchment paper into the tempered chocolate and set it aside for a few minutes to allow the chocolate to set. The chocolate should gradually harden and form a smooth, even surface without streaks or a dull appearance. Once the chocolate sets, examine its texture and appearance. Properly tempered chocolate will exhibit a glossy shine and a firm, crisp texture when broken. It should release cleanly from the palette knife or parchment paper, indicating that the cocoa butter has crystallized into the stable Type V form.
Another method for testing tempered chocolate involves applying a small amount of the chocolate to a piece of parchment paper or a cool, clean surface. The chocolate should begin to set within a few minutes, forming a smooth and uniform surface. If the chocolate sets too quickly or too slowly, or if it exhibits streaks, a dull appearance, or a soft texture, it may indicate that the tempering process requires adjustment.
By conducting thorough tests on the tempered chocolate, you can ensure that it meets the stringent criteria for professional-quality confections. The testing process provides valuable feedback on the success of the tempering process, allowing you to make any necessary adjustments to achieve the desired results. With practice and attention to detail, you can develop a keen eye for evaluating the tempered chocolate, enabling you to consistently produce flawless creations with a perfect finish.
Mastering the art of testing tempered chocolate is a pivotal skill in the realm of confectionery and pastry work. By honing your ability to assess the texture, appearance, and setting properties of tempered chocolate, you gain the confidence to create stunning chocolate confections, from intricately molded pralines to elegantly enrobed truffles. With each successful test, you reaffirm your mastery of chocolate tempering, setting the stage for the creation of exquisite and professional-quality chocolate delights.
Troubleshooting Common Issues
Even with careful attention to detail, chocolate tempering can sometimes present challenges that require troubleshooting to achieve the desired results. Understanding common issues and their remedies is essential for mastering the art of chocolate tempering. Here are some common problems encountered during the tempering process and their corresponding solutions:
1. Chocolate Not Setting Properly
- Issue: If the tempered chocolate does not set within the expected timeframe or remains soft and tacky, it may indicate incomplete crystallization.
- Solution: Reheat the chocolate gently to raise its temperature slightly, ensuring that it remains within the recommended tempering range. Stir the chocolate to encourage further crystallization, then perform a new temper test to verify the results.
2. Streaks or Dull Appearance
- Issue: Streaks or a dull finish on the tempered chocolate can result from inadequate crystallization or improper handling during the tempering process.
- Solution: Re-temper the chocolate using the seeding method, paying close attention to the temperature ranges and the incorporation of the seed chocolate. Ensure that the chocolate is agitated consistently to promote uniform crystallization and a glossy finish.
3. Chocolate Seizing
- Issue: Seized chocolate occurs when moisture comes into contact with the melted chocolate, causing it to become thick and grainy.
- Solution: If the chocolate seizes, it may be challenging to salvage for tempering. However, you can attempt to rescue it by adding a small amount of cocoa butter or vegetable oil and gently heating the mixture to restore its fluidity. Use the recovered chocolate for applications where a smooth texture is not crucial.
4. Overheating the Chocolate
- Issue: Overheating the chocolate can lead to scorching, resulting in a burnt flavor and compromised texture.
- Solution: If the chocolate is overheated, allow it to cool slightly before incorporating additional seed chocolate to lower its temperature. Stir the chocolate gently to encourage the formation of stable crystals, and monitor the temperature closely to prevent further overheating.
5. Inconsistent Texture
- Issue: Inconsistent texture in the tempered chocolate may arise from fluctuations in temperature or inadequate agitation during the tempering process.
- Solution: Ensure that the chocolate is maintained within the recommended tempering range throughout the process, and stir it consistently to promote uniform crystallization. Adjust the tempering method and technique to achieve a smooth and consistent texture in the finished chocolate.
By addressing these common issues and implementing the corresponding solutions, you can overcome challenges in chocolate tempering and refine your skills to consistently produce flawless results. Troubleshooting common problems empowers you to navigate the intricacies of chocolate tempering with confidence, ensuring that your chocolate creations exhibit the hallmark characteristics of professional-quality confections.
Conclusion
In conclusion, mastering the art of chocolate tempering is a transformative journey that empowers confectioners and pastry enthusiasts to elevate their creations to new heights of excellence. Through the meticulous manipulation of chocolate's temperature and crystalline structure, individuals can achieve stunning results, characterized by a glossy sheen, a satisfying snap, and a luxuriously smooth texture. The process of tempering chocolate, while requiring precision and attention to detail, offers a deeply rewarding experience that unlocks the full potential of this beloved ingredient.
As we've explored in this comprehensive guide, the key to successful chocolate tempering lies in understanding the science behind cocoa butter crystallization and employing the appropriate techniques to guide the process. From the initial steps of melting the chocolate with care to the strategic use of the seeding method and the critical testing of the tempered chocolate, each stage contributes to the mastery of this fundamental skill.
The journey of chocolate tempering is not without its challenges, as evidenced by the common issues encountered during the process. However, by equipping oneself with the knowledge to troubleshoot and adjust the tempering process, individuals can navigate these obstacles with confidence, ultimately honing their expertise and achieving consistent, professional-quality results.
Furthermore, the art of chocolate tempering extends far beyond the technical aspects, encompassing a deep appreciation for the sensory delights that well-tempered chocolate offers. From the rich aroma that fills the air during the melting process to the visual allure of perfectly set chocolate creations, tempering chocolate is a multi-sensory experience that engages the palate, the eyes, and the soul.
Ultimately, mastering chocolate tempering opens the door to a world of creative possibilities, allowing individuals to craft an array of exquisite confections, from intricately molded chocolates to elegantly enrobed truffles and delicate chocolate decorations. Whether pursuing a professional culinary career or simply seeking to delight friends and family with artisanal treats, the art of chocolate tempering empowers individuals to create memorable experiences through the medium of chocolate.
As we conclude this guide, it's important to recognize that chocolate tempering is not merely a technical skill but a form of culinary artistry that invites individuals to express their creativity and passion. With dedication, practice, and a deep understanding of the tempering process, anyone can embark on this journey and unlock the potential to create exceptional chocolate delights that captivate the senses and bring joy to those who indulge in them.