Home>Culinary & Beverages>Mastering The Art Of Tempering Chocolate
Culinary & Beverages
Mastering The Art Of Tempering Chocolate
Published: February 22, 2024
Learn the art of tempering chocolate with our expert culinary and beverages guide. Master the techniques for perfect chocolate every time. Unlock the secrets of chocolate mastery today!
(Many of the links in this article redirect to a specific reviewed product. Your purchase of these products through affiliate links helps to generate commission for Temperatures.com, at no extra cost. Learn more)
Table of Contents
Understanding the Science of Chocolate Tempering
Tempering chocolate is a precise process that involves manipulating the cocoa butter crystals within the chocolate to achieve a smooth, glossy finish and a satisfying snap when broken. The science behind chocolate tempering lies in the crystallization of cocoa butter, the primary fat in chocolate. Cocoa butter can form six different types of crystals, but only one of these types, known as the beta crystal, produces the desired characteristics in tempered chocolate.
When chocolate is melted, the cocoa butter crystals become disorganized. By carefully controlling the temperature during the cooling process, it is possible to encourage the formation of stable beta crystals while preventing the formation of undesirable crystal structures. This is achieved through a series of temperature manipulations, which allow the cocoa butter to solidify in a stable crystalline form.
The temperature at which chocolate is melted and then cooled is crucial to the tempering process. Heating chocolate to around 45-50°C (113-122°F) melts all the existing cocoa butter crystals. The chocolate is then cooled to approximately 27-28°C (80.6-82.4°F), which encourages the formation of the stable beta crystals. Finally, the chocolate is gently reheated to around 31-32°C (87.8-89.6°F) to ensure that any remaining unstable crystals are melted, leaving only the desired beta crystals.
By achieving the right crystal structure through tempering, the chocolate will have a glossy appearance, a firm texture, and a clean snap when broken. This process also ensures that the chocolate will contract slightly as it cools, making it easier to release from molds and creating a professional finish for dipped or enrobed confections.
Understanding the science of chocolate tempering is essential for anyone working with chocolate, whether professionally or at home. By mastering this process, individuals can consistently produce high-quality, beautifully tempered chocolate for a wide range of delicious applications.
Essential Tools and Ingredients for Tempering Chocolate
Tempering chocolate requires precision and the right tools and ingredients to achieve the desired results. Here are the essential items you'll need to successfully temper chocolate:
Tools:
- Double Boiler or Microwave: A double boiler provides gentle, indirect heat for melting chocolate, while a microwave can be used for convenience. Both methods are effective, but it's important to avoid overheating the chocolate, as this can lead to tempering issues.
- Chocolate Thermometer: A reliable thermometer is crucial for monitoring the temperature of the chocolate throughout the tempering process. Digital thermometers are recommended for their accuracy and ease of use.
- Offset Spatula: This tool is useful for spreading the melted chocolate evenly and smoothly, especially when working with molds or creating chocolate decorations.
- Rubber Spatula: A rubber spatula is essential for stirring and scraping the sides of the bowl or double boiler to ensure even heating and melting of the chocolate.
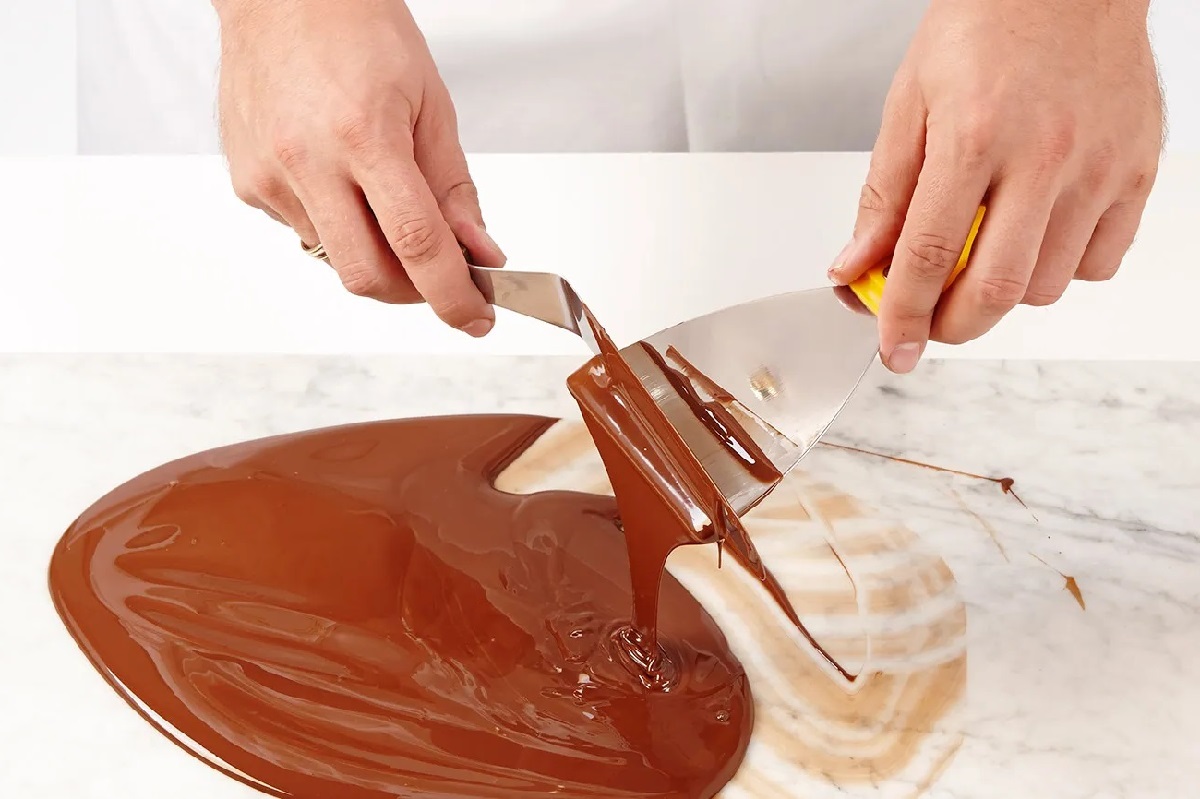
- Cool, Clean Work Surface: Marble or granite surfaces are ideal for tempering chocolate as they provide a cool environment for the chocolate to set properly.
Ingredients:
- High-Quality Chocolate: Use couverture or high-quality chocolate with a cocoa butter content of at least 30-32%. Quality chocolate is essential for achieving a smooth, glossy finish and superior flavor.
- Seeding Chocolate: This refers to reserved tempered chocolate that is added to the melted chocolate to encourage the formation of stable cocoa butter crystals. The seeding chocolate should be finely chopped and added gradually during the tempering process.
- Optional Flavorings: Vanilla extract, espresso powder, or other flavorings can be added to the tempered chocolate to enhance its taste and aroma.
By having the right tools and ingredients at your disposal, you can approach the chocolate tempering process with confidence and precision. These essential items will enable you to create beautifully tempered chocolate that is perfect for a wide range of delightful confections and desserts.
Step-by-Step Guide to Tempering Chocolate
-
Prepare the Work Surface: Begin by ensuring that your work surface is clean, dry, and cool. Marble or granite surfaces are ideal for tempering chocolate, as they provide the necessary cool environment for the chocolate to set properly.
-
Select and Chop the Chocolate: Choose high-quality chocolate with a cocoa butter content of at least 30-32%. Using a sharp knife, finely chop the chocolate into small, uniform pieces. This will help the chocolate melt evenly and facilitate the tempering process.
-
Melt the Chocolate: There are two common methods for melting chocolate: using a double boiler or a microwave. If using a double boiler, place the chopped chocolate in the top bowl and gently melt it over simmering water, stirring occasionally. If using a microwave, place the chopped chocolate in a microwave-safe bowl and heat it in short intervals, stirring between each interval until smooth and fully melted. It's important to avoid overheating the chocolate, as this can lead to tempering issues.
-
Check the Temperature: Once the chocolate is melted, use a reliable thermometer to check the temperature. The chocolate should reach around 45-50°C (113-122°F) for dark chocolate or 40-45°C (104-113°F) for milk or white chocolate.
-
Cool the Chocolate: Transfer about two-thirds of the melted chocolate to a clean, dry bowl. Begin cooling the chocolate by stirring it gently and continuously, allowing it to reach a temperature of approximately 27-28°C (80.6-82.4°F) for dark chocolate or 26-27°C (78.8-80.6°F) for milk or white chocolate. This cooling process encourages the formation of stable beta crystals in the chocolate.
-
Reheat the Chocolate: Once the chocolate has reached the desired temperature, place the bowl over a double boiler or use brief bursts in the microwave to gently reheat the chocolate to around 31-32°C (87.8-89.6°F) for dark chocolate or 29-30°C (84.2-86°F) for milk or white chocolate. This final heating ensures that any remaining unstable crystals are melted, leaving only the desired beta crystals.
-
Test the Tempered Chocolate: To check if the chocolate is properly tempered, spread a small amount on a piece of parchment paper and allow it to set for a few minutes. The tempered chocolate should have a glossy appearance and a firm texture. It should also contract slightly as it cools, making it easier to release from the parchment paper.
By following this step-by-step guide, you can successfully temper chocolate, resulting in beautifully glossy and firm chocolate that is perfect for a wide range of delightful confections and desserts.
Troubleshooting Common Issues in Chocolate Tempering
Even with careful attention to detail, chocolate tempering can sometimes present challenges. Understanding and addressing common issues that may arise during the tempering process is essential for achieving consistently high-quality results. Here are some common problems encountered in chocolate tempering and the corresponding troubleshooting steps:
Dull or Streaky Appearance
If the tempered chocolate has a dull or streaky appearance, it may indicate improper crystallization. This can occur if the chocolate is not cooled and reheated to the correct temperatures. To address this issue, consider the following troubleshooting steps:
- Check the tempering temperatures: Ensure that the chocolate is cooled to the appropriate temperature range to encourage the formation of stable beta crystals. Reheat the chocolate gently to eliminate any remaining unstable crystals.
- Use seeding chocolate: Adding finely chopped tempered chocolate to the melted chocolate can help initiate the formation of stable crystals and improve the overall appearance.
Soft or Sticky Texture
Chocolate that remains soft or sticky after tempering may be the result of inadequate cooling or reheating. To troubleshoot this issue, consider the following steps:
- Verify the cooling temperature: Ensure that the chocolate is cooled to the specified temperature range before reheating. Inadequate cooling can lead to the retention of unstable crystals, affecting the texture of the tempered chocolate.
- Adjust the reheating process: Gentle and gradual reheating is crucial to melting any remaining unstable crystals and achieving the desired beta crystal structure.
Rapid Setting or Blooming
Rapid setting or the presence of white streaks on the surface of the tempered chocolate indicates improper cooling or handling. To address this issue, consider the following troubleshooting steps:
- Control the cooling environment: Ensure that the chocolate is cooled in a stable and cool environment, such as a marble or granite surface, to promote proper crystallization.
- Avoid abrupt temperature changes: Sudden fluctuations in temperature can lead to rapid setting or blooming. Handle the tempered chocolate with care to prevent exposure to extreme temperature variations.
Read more: Perfecting The Art Of Cooking A Medium Steak
Grainy Texture
A grainy texture in tempered chocolate can result from inadequate melting or improper handling. To troubleshoot this issue, consider the following steps:
- Ensure thorough melting: Properly melt the chocolate using a double boiler or microwave, taking care to avoid overheating, which can lead to a grainy texture.
- Use high-quality chocolate: Inferior chocolate can contribute to a grainy texture in the tempered chocolate. Opt for high-quality couverture chocolate with a sufficient cocoa butter content.
By understanding and addressing these common issues in chocolate tempering, individuals can refine their techniques and consistently produce beautifully tempered chocolate for a variety of culinary applications.
Creative Ways to Use Tempered Chocolate in Desserts and Confections
Tempered chocolate is a versatile and essential ingredient in the creation of a wide array of delectable desserts and confections. Its glossy appearance, firm texture, and satisfying snap make it a perfect choice for elevating sweet treats to a whole new level. Here are some creative and mouthwatering ways to incorporate tempered chocolate into your culinary creations:
1. Chocolate-Dipped Fruits
Indulge in the natural sweetness of fresh fruits by dipping them in tempered chocolate. Whether it's strawberries, bananas, or orange segments, the combination of juicy fruit and rich, velvety chocolate creates a delightful contrast of flavors and textures. The process of dipping fruits in tempered chocolate also allows for endless decorative possibilities, making them an elegant and irresistible treat for any occasion.
2. Artisanal Chocolate Bars
Unleash your creativity by crafting artisanal chocolate bars using tempered chocolate as the base. Experiment with a variety of flavor combinations by incorporating nuts, dried fruits, or aromatic spices into the chocolate. From classic almond and sea salt to exotic matcha and coconut, the possibilities are endless. Personalized chocolate bars make for thoughtful gifts and delightful indulgences for chocolate enthusiasts.
Read more: Perfecting The Art Of Cooking A Medium Steak
3. Chocolate-Covered Confections
Elevate everyday confections such as marshmallows, pretzels, or caramel candies by enrobing them in tempered chocolate. The contrast between the creamy, sweet fillings and the crisp, chocolate coating creates a harmonious blend of flavors and textures. These chocolate-covered delights are perfect for gifting or as a luxurious addition to dessert platters.
4. Decorative Chocolate Garnishes
Transform desserts into works of art by creating decorative chocolate garnishes using tempered chocolate. From delicate curls and intricate shavings to elegant spirals and whimsical shapes, these edible adornments add a touch of sophistication to cakes, pastries, and plated desserts. The versatility of tempered chocolate allows for the creation of custom garnishes that complement and enhance the visual appeal of any sweet creation.
5. Chocolate-Coated Nuts and Seeds
Combine the earthy richness of nuts and seeds with the lusciousness of tempered chocolate to create irresistible chocolate-coated treats. Whether it's almonds, hazelnuts, or pumpkin seeds, the marriage of crunchy, nutty flavors with the smoothness of chocolate is a match made in dessert heaven. These delectable morsels are perfect for snacking or as a luxurious addition to homemade trail mixes.
Incorporating tempered chocolate into desserts and confections opens up a world of culinary possibilities, allowing for the creation of visually stunning and irresistibly delicious treats. Whether you're a seasoned chocolatier or an enthusiastic home baker, the art of chocolate tempering adds a touch of elegance and indulgence to your sweet creations.